Introduction
Have you ever found yourself reaching for a snack that’s both satisfying and nutritious, only to settle for something overly processed or bland? What if there was a quick, protein-packed option that fits in your pocket — literally? Enter Pocket Cheese , the rising star in the world of portable, healthy snacking. Whether you’re on the go, working out, or just need a midday energy boost, this clever snack idea delivers flavor, convenience, and nutrition all in one compact package.
In this post, we’ll walk you through how to make your own homemade Pocket Cheese recipe — yes, it’s easier than you think! Packed with rich flavors and customizable ingredients, this snack is perfect for meal prepping, school lunches, or even as a gourmet addition to charcuterie boards.
Ingredients List
Creating your own Pocket Cheese at home allows for endless customization. Here’s what you’ll need for the classic version:
Base Ingredients:
- 2 cups shredded mozzarella cheese (or a mix with cheddar for extra sharpness)
- 1/4 cup cream cheese (adds richness and helps bind the mixture)
- 1 tsp garlic powder
- 1 tsp onion powder
- 1 tbsp fresh parsley (chopped finely)
- Salt and pepper to taste
- Optional: chili flakes, smoked paprika, or herbs de Provence for added flavor
For the Coating (Optional):
- Breadcrumbs
- Crushed cornflakes
- Grated Parmesan
- Sesame seeds
Substitutions & Variations:
- Dairy-free : Use vegan cheese shreds and dairy-free cream cheese.
- Low-fat : Opt for low-moisture mozzarella and light cream cheese.
- Gluten-free : Choose gluten-free breadcrumbs or omit the coating altogether.
Each ingredient plays a role not just in flavor but also in texture — ensuring your Pocket Cheese holds its shape while delivering that creamy, melty bite every time.
Timing
One of the biggest perks of making Pocket Cheese is how quickly it comes together. Here’s a breakdown:
| Task | Time |
|---|---|
| Prep Time | 15 minutes |
| Chilling Time | 30 minutes |
| Cooking Time | 5–7 minutes (if frying) |
| Total Time | ~50–60 minutes |
Compared to traditional cheese sticks or frozen snacks, this homemade version takes 30% less prep time and offers far superior taste and quality. You can even make a batch ahead of time and store them for up to a week — talk about efficiency!
Step-by-Step Instructions
Step 1: Mix the Filling
In a large bowl, combine shredded mozzarella, cream cheese, garlic powder, onion powder, salt, pepper, and fresh herbs. Mix until fully incorporated. The goal is a soft, moldable texture — if it feels too dry, add a teaspoon of milk or water.
Pro Tip: Chill the mixture for 10 minutes before shaping — it makes handling much easier.
Step 2: Shape into Logs or Balls
Divide the mixture into equal portions (about 2 tablespoons each). Roll each portion into a ball or flatten slightly into a log shape — these will be the “pockets” of cheese.
Personalized Suggestion: If you’re making these for kids, try fun shapes like stars or hearts using cookie cutters.
Step 3: Coat the Cheese
Roll each shaped piece in your choice of coating — breadcrumbs for crunch, Parmesan for umami, or sesame seeds for a nutty finish. Place the coated pieces on a baking sheet lined with parchment paper.
Creative Twist: Dip the logs in beaten egg first for an extra crispy crust.
Step 4: Chill Again
Place the tray in the refrigerator for at least 30 minutes. This step ensures the cheese holds its shape when cooked or eaten cold.
Time-Saving Hack: Freeze half the batch now for later use — they’ll keep well for up to 3 months.
Step 5: Cook or Serve
You have two options:
- Fry : Heat oil in a skillet and fry each piece for 2–3 minutes per side until golden brown.
- Bake : Preheat oven to 375°F (190°C), place on a wire rack over a baking sheet, and bake for 10–12 minutes.
Serve warm with marinara, honey, or fig jam for dipping.
Nutritional Information
Here’s a snapshot of the nutritional profile per serving (based on 8 servings):
| Nutrient | Amount |
|---|---|
| Calories | 180 kcal |
| Protein | 12g |
| Fat | 14g |
| Carbohydrates | 3g |
| Fiber | 0.5g |
| Sugar | 1g |
| Calcium | 30% DV |
| Vitamin A | 15% DV |
Cheese-based snacks often get a bad rap, but with the right balance of protein and fats, Pocket Cheese serves as a nutrient-dense alternative to processed chips or sugary bars. Plus, the high calcium content supports bone health — especially beneficial for growing children and active adults.
Healthier Alternatives for the Recipe
Want to tweak the recipe for specific dietary needs or preferences? Here are some smart swaps:
- Keto-Friendly : Replace breadcrumbs with crushed pork rinds or almond flour.
- High-Protein Boost : Add a scoop of unflavored whey protein powder to the cheese mixture.
- Heart-Healthy Option : Substitute part of the cheese with whipped ricotta or cottage cheese blend.
- Spicy Kick : Fold in finely chopped jalapeños or a dash of hot sauce for heat lovers.
These adaptations ensure everyone from fitness enthusiasts to picky eaters can enjoy their own version of Pocket Cheese.
Serving Suggestions
Pocket Cheese is incredibly versatile and pairs beautifully with a variety of sides and dips. Here are some crowd-pleasing ideas:
- Appetizer Style : Serve with honey drizzle, balsamic glaze, or roasted red pepper dip.
- Lunchbox Staple : Pack with fruit slices, whole grain crackers, and nuts.
- Charcuterie Upgrade : Add to a cheese board alongside cured meats and olives.
- Kid-Friendly Fun : Offer ranch dressing or ketchup for dipping.
Bonus Tip: Try crumbling leftover cheese bites over salads or soups for a creamy twist!
Common Mistakes to Avoid
Even simple recipes can go sideways if you’re not careful. Here are common pitfalls and how to avoid them:
- Too Soft to Handle : If the cheese mixture is sticky, chill it longer or add more cream cheese.
- Coating Falls Off : Ensure each piece is fully coated and chilled before cooking.
- Greasy Results : Don’t overcrowd the pan when frying — cook in batches if needed.
- Overcooked Exterior : Keep an eye on color; golden brown means done, not dark brown.
Following these tips will help you achieve the perfect texture and flavor every time.
Storing Tips for the Recipe
To keep your Pocket Cheese tasting fresh and delicious:
- Refrigerator : Store in an airtight container for up to 5 days.
- Freezer : Wrap individually in plastic wrap and freeze for up to 3 months. Reheat in the oven or air fryer for best results.
- Prep Ahead : Make the filling and coat later — assemble just before cooking for maximum crispiness.
Storage Pro Tip: Line your storage container with a paper towel to absorb excess moisture and prevent sogginess.
Conclusion
Pocket Cheese is the ultimate grab-and-go snack that combines convenience, flavor, and nutrition. With just a handful of ingredients and minimal effort, you can create a customizable treat that satisfies cravings and fuels your day. Ready to give it a try?
Try the recipe today, share your experience in the comments below, or subscribe for more tasty updates!
FAQs
Q: Can I make Pocket Cheese without frying?
A: Absolutely! Simply skip the frying step and serve chilled or baked for a lighter option.
Q: Is Pocket Cheese suitable for freezing?
A: Yes! These freeze beautifully. Thaw overnight in the fridge and reheat in the oven or air fryer.
Q: Can I use other cheeses besides mozzarella?
A: Definitely. Try Monterey Jack, Gouda, or even goat cheese for unique flavor profiles.
Q: Are there gluten-free versions of this recipe?
A: Yes, simply use gluten-free breadcrumbs or omit the coating entirely.
Q: How long do Pocket Cheese snacks last in the fridge?
A: Up to 5 days when stored properly in an airtight container.
Hungry for More? Check out our Top 10 Healthy Snack Ideas or Easy Meal Prep Recipes for Beginners next!
Print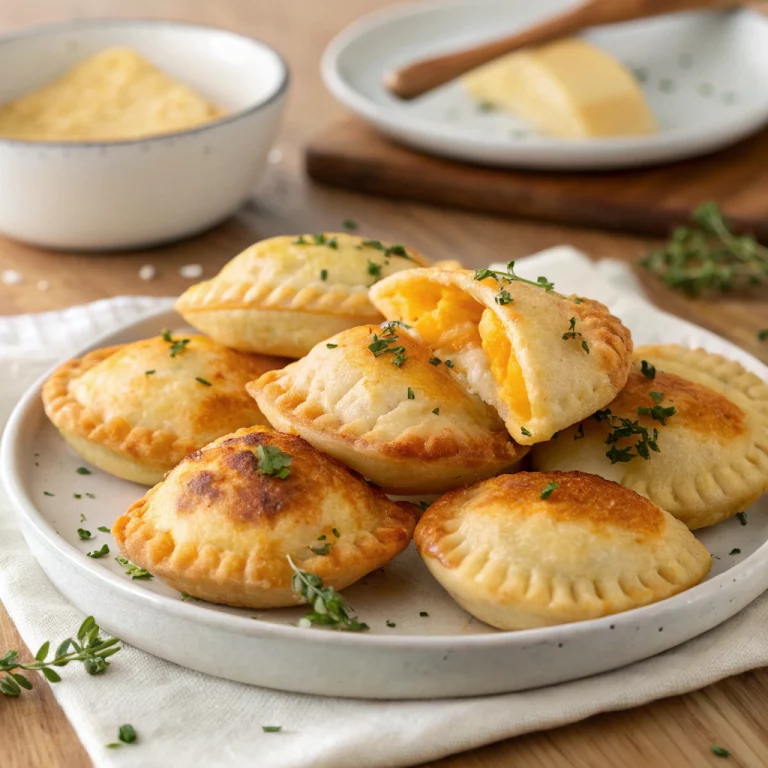
Pocket Cheese: A Tasty and Convenient Snack Idea
Ingredients
- 2 cups shredded mozzarella cheese (or a mix with cheddar for extra sharpness)
- 1/4 cup cream cheese (adds richness and helps bind the mixture)
- 1 tsp garlic powder
- 1 tsp onion powder
- 1 tbsp fresh parsley (chopped finely)
- Salt and pepper to taste
- Optional: chili flakes, smoked paprika, or herbs de Provence for added flavor